原文链接:Managing State in Angular with ngrx/store
作者:Kim Maida
翻译:野草
PS 由于知乎的编辑器不太友好,文中代码格式没有缩进。可以点击这里阅读。
本文将与你一起探讨如何用不可变数据储存的方式进行Angular应用的状态管理 :ngrx/store——Angular的响应式Redux。本文将会完成一个小型简单的Angular应用,最终代码可以在这里下载。
Angular应用中的状态管理
近几年,大型复杂Angular/AngularJS项目的状态管理一直是个让人头疼的问题。在AngularJS(1.x版本)中,状态管理通常由服务,事件,$rootScope混合处理。在Angular中(2+版本),组件通信让状态管理变得清晰一些,但还是有点复杂,根据数据流向不同会用到很多方法。
注意:本文中,AngularJS特指1.x版本,Angular对应2.0版本及其以上。
有人用Redux来管理AngularJS或者Angular的状态。Redux是JavaScript应用的可预测状态容器,支持单一不可变数据储存。Redux最有名的就是结合React的使用,当然它可以用于任意的视图层框架。Egghead.io发布了一份非常优质的Redux免费视频教程,视频由Redux作者Dan Abramov本人讲解。
初识ngrx/store
本文将采用ngrx/store管理我们的Angular应用。那么,ngrx/store和Redux什么关系呢?为什么不用Redux呢?
与Redux的关系
ngrx/store的灵感来源于Redux,是一款集成RxJS的Angular状态管理库,由Angular的布道者Rob Wormald开发。它和Redux的核心思想相同,但使用RxJS实现观察者模式。它遵循Redux核心原则,但专门为Angular而设计。
ngrx/store中的基本原则
- State(状态) 是指单一不可变数据
- Action(行为) 描述状态的变化
- Reducer(归约器/归约函数) 根据先前状态以及当前行为来计算出新的状态
状态用State的可观察对象,Action的观察者——
Store来访问我们会详细解释说明。先快速过一遍基础,然后在实战的过程中慢慢深入解释。
Actions(行为)
Actions是信息的载体,它发送数据到reducer,然后reducer更新store。Actions是store能接受数据的唯一方式。
在ngrx/store里,Action的接口是这样的:
// actions包括行为类型和对应的数据载体
export interface Action {
  type: string;
  payload?: any;
}
type描述我们期待的状态变化类型。比如,添加待办'ADD_TODO',增加'DECREMENT'等。payload是发送到待更新store中的数据。store派发action的代码类似如下:
// 派发action,从而更新store
store.dispatch({
  type: 'ADD_TODO',
  payload: 'Buy milk'
});
Reducers(归约器)
Reducers规定了行为对应的具体状态变化。它是纯函数,通过接收前一个状态和派发行为返回新对象作为下一个状态的方式来改变状态,新对象通常用Object.assign和扩展语法来实现。
// reducer定义了action被派发时state的具体改变方式
export const todoReducer = (state = [], action) => {
  switch(action.type) {
    case 'ADD_TODO':
      return [...state, action.payload];
    default:
      return state;
  }
}
开发时特别要注意函数的纯性。因为纯函数:
- 不会改变它作用域外的状态
- 输出只决定于输入
- 相同输入,总是得到相同输出
关于函数的纯性,可以点击这里进一步了解。开发时,要确保函数的纯性和状态不可变性,所以写reducers的时候要多加小心。
Store(存储)
store中储存了应用中所有的不可变状态。ngrx/store中的store是RxJS状态的可观察对象,以及行为的观察者。
我们可以利用Store来派发行为。当然,我们也可以用Store的select()方法获取可观察对象,然后订阅观察,在状态变化之后做出反应。
ngrx/store实战:个性宠物标签
目前我们熟悉了ngrx/store的基本工作原理,接下来我们来开发一个能让用户自定义宠物名称标签的应用。该应用将会有以下功能:
- 用户可以选择标签形状,字体,文案,以及附加特性
- 创建过程可以预览标签效果
- 完成后,可以继续创建
我们需要创建几个组件来组合成标签生成器和标签预览,还会添加登录,创建标签,完成创建的组件和路由。这个小应用的状态将会用ngrx/store来管理。
完成后的个性宠物标签app效果如下:
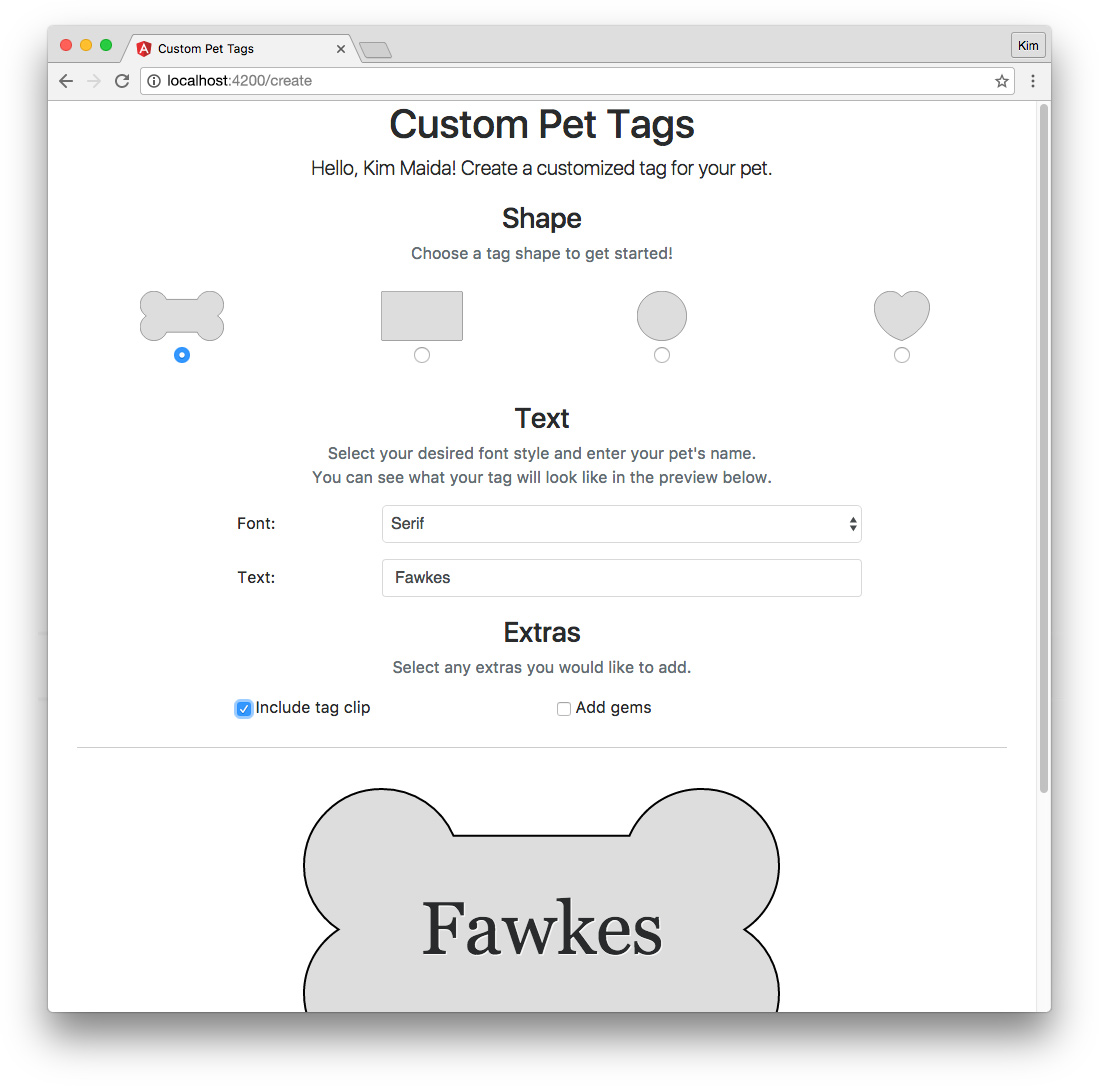
让我们开始吧!
Angular应用设置
安装依赖
确保你已经安装了NodeJS,推荐LTS版本。
用npm安装Angular CLI包,方便一键生成项目手脚架。运行以下命令来全局安装angular-cli。
$ npm install -g @angular/cli
创建项目
选好项目所在的文件夹,打开命令行,输入以下命令来创建一个新的Angular项目:
$ ng new pet-tags-ngrx
进入新创建的文件夹,安装必要的包:
$ cd pet-tags-ngrx
$ npm install @ngrx/core @ngrx/store --save
一切准备就绪,可以开始开发了。
定制你的项目模板
让我们根据这个项目的需求,稍微改造一下项目模板。
创建src/app/core文件夹
首先,创建文件夹src/app/core。应用的根组件和核心文件都会放在这个文件夹下。将所有的app.component.*文件移动到这里。
注意:简洁起见,该教程不会包含测试。我们会忽略所有的
*.spec.ts文件。如果你想写测试的话,可以自己写。所以,文中不会再提到这些文件。同样,出于清晰简洁性的考虑,github仓库的最终版代码删除了所有测试相关的文件。
更新App模块
接着,打开src/app/app.module.ts文件,更新app.component的路径:
// src/app/app.module.ts
...
import { AppComponent } from './core/app.component';
...
静态资源整理
定位到src/assets文件夹。
在assets文件夹下新建一个images的文件夹,稍后我们会添加一些图片。然后,将根目录下的src/styles.css移动到src/assets下。
styles.css的移动需要我们修改.angular-cli.json的配置。打开这个文件,把styles属性改成如下:
// .angular-cli.json
...
"styles": [
  "assets/styles.css"
],
...
集成Bootstrap
最后,在index.html中添加Bootstrap样式。在<link>标签上加上CDN地址。这里我们只用到样式,不需要脚本文件。顺便,更新一下标题,变成Custom Pet Tags:
<!-- index.html -->
...
  <title>Custom Pet Tags</title>
  ...
  <!-- Bootstrap CDN -->
  <link
    rel="stylesheet"
    href="https://maxcdn.bootstrapcdn.com/bootstrap/4.0.0-alpha.6/css/bootstrap.min.css"
    integrity="sha384-rwoIResjU2yc3z8GV/NPeZWAv56rSmLldC3R/AZzGRnGxQQKnKkoFVhFQhNUwEyJ"
    crossorigin="anonymous">
</head>
启动服务
我们可以在本地起个服务,然后监听文件变化实时更新:
$ ng serve
在浏览器中输入http://localhost:4200,程序成功运行。
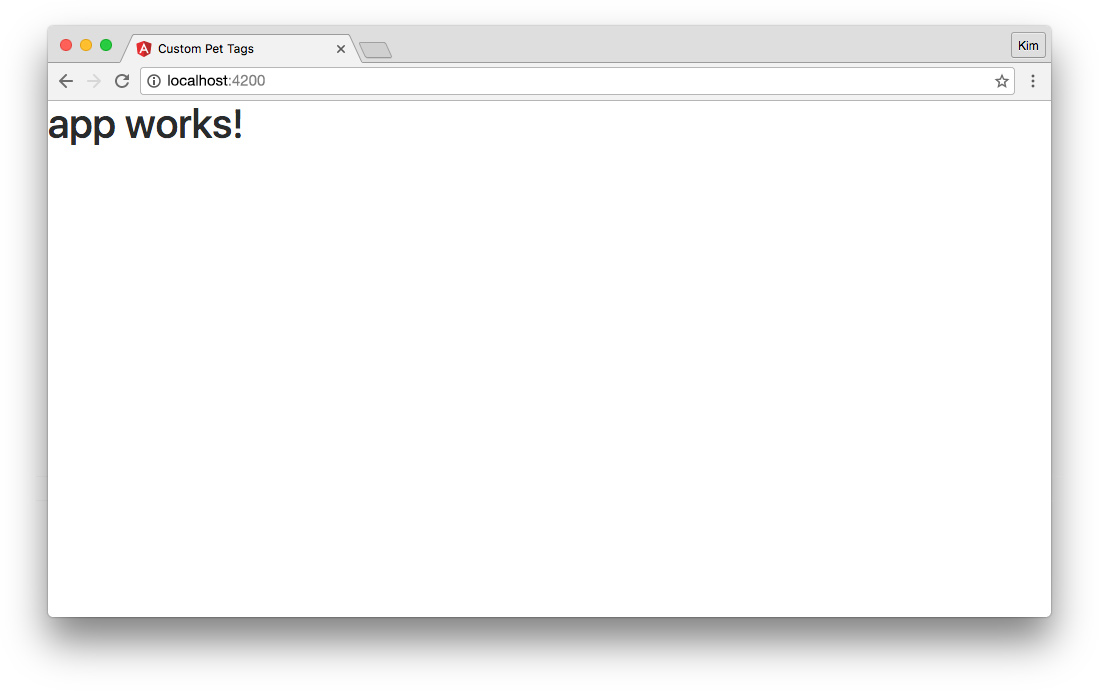
App组件
现在开始创建新功能。从根组件app.component.*入手。不要担心,变化很小。
删除样式文件
删除app.component.css文件。该组件只用Bootstrap来定义样式,所以不需要额外样式。
根组件脚本
在app.component.ts文件中删除对上述样式文件的引用。我们也可以删除AppComponent类中的title属性。
// src/app/core/app.component.ts
import { Component } from '@angular/core';

@Component({
  selector: 'app-root',
  templateUrl: './app.component.html'
})
export class AppComponent {

}
根组件模版
在app.component.html中添加一些内容,变成如下:
<!-- src/app/core/app.component.html -->
<div class="container">
  <div class="row">
    <div class="col-sm-12">
      <h1 class="text-center">Custom Pet Tags</h1>
    </div>
  </div>
  <router-outlet></router-outlet>
</div>
我们用Bootstrap来添加珊格系统和标题。然后添加一个<router-outlet>指令,这是当这个单页面应用中添加路由后,视图会渲染的地方。到现在为止,程序会报错。等我们建好了路由和page组件的时候,就好了。
创建页面组件
如上所述,应用会包含三个路由:登录主页,创建预览页,以及完成页。
我们先创建好各页面手脚架,以便搭建路由。然后再回来完善各个组件。
在根目录下运行如下指令创建页面组件:
$ ng g component pages/home
$ ng g component pages/create
$ ng g component pages/complete
ng g命令可以快速生成组件,指令,过滤器和服务,同时也会自动把生成的文件导入到app.module.ts中。现在,我们有三个页面组件的脚手架,可以开始搭建路由了。
搭建路由
新建一个路由模块,在src/app/core文件夹下创建一个app-routing.module.ts文件:
// src/app/core/routing-module.ts
import { NgModule } from '@angular/core';
import { RouterModule } from '@angular/router';

import { HomeComponent } from '../pages/home/home.component';
import { CreateComponent } from './../pages/create/create.component';
import { CompleteComponent } from './../pages/complete/complete.component';


@NgModule({
  imports: [
    RouterModule.forRoot([
      {
        path: '',
        component: HomeComponent
      },
      {
        path: 'create',
        component: CreateComponent
      },
      {
        path: 'complete',
        component: CompleteComponent
      },
      {
        path: '**',
        redirectTo: '',
        pathMatch: 'full'
      }
    ])
  ],
  providers: [],
  exports: [
    RouterModule
  ]
})
export class AppRoutingModule {}
现在有三个路由/,/create,/complete,未知路由会重定向到首页。
打开根模块文件app.module.ts,添加新增路由模块AppRoutingModule至imports属性。
// src/app/app.module.ts
...
import { AppRoutingModule } from './core/app-routing.module';

@NgModule({
  ...,
  imports: [
    ...,
    AppRoutingModule
  ],
  ...
到此,路由设置完毕。我们可以通过路由来访问不同页面,访问首页的时候,HomeComponent就会渲染在<router-outlet>所在的位置,如下图所示:
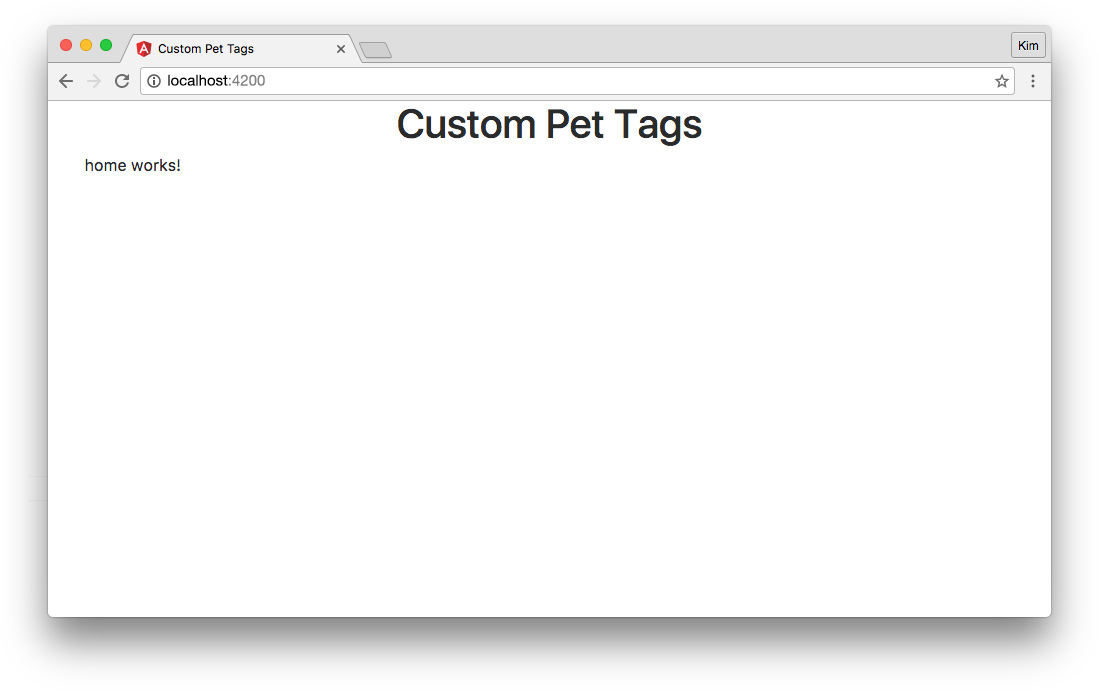
“Home”页面组件
HomeComponent会有简单的信息提示,以及登录按钮。点击登录按钮,直接跳转到/create页面。
现在,让我们添加提示信息和跳转到/create页面的按钮。打开home.component.html,替换内容如下:
<!-- src/app/pages/home/home.component.html -->
<div class="row">
  <div class="col-sm-12 text-center">
    <p class="lead">
      Please sign up or log in to create a custom name tag for your beloved pet!
    </p>
    <p>
      <button
        class="btn btn-lg btn-primary"
        routerLink="/create">Log In</button>
    </p>
  </div>
</div>
现在,首页效果如下:
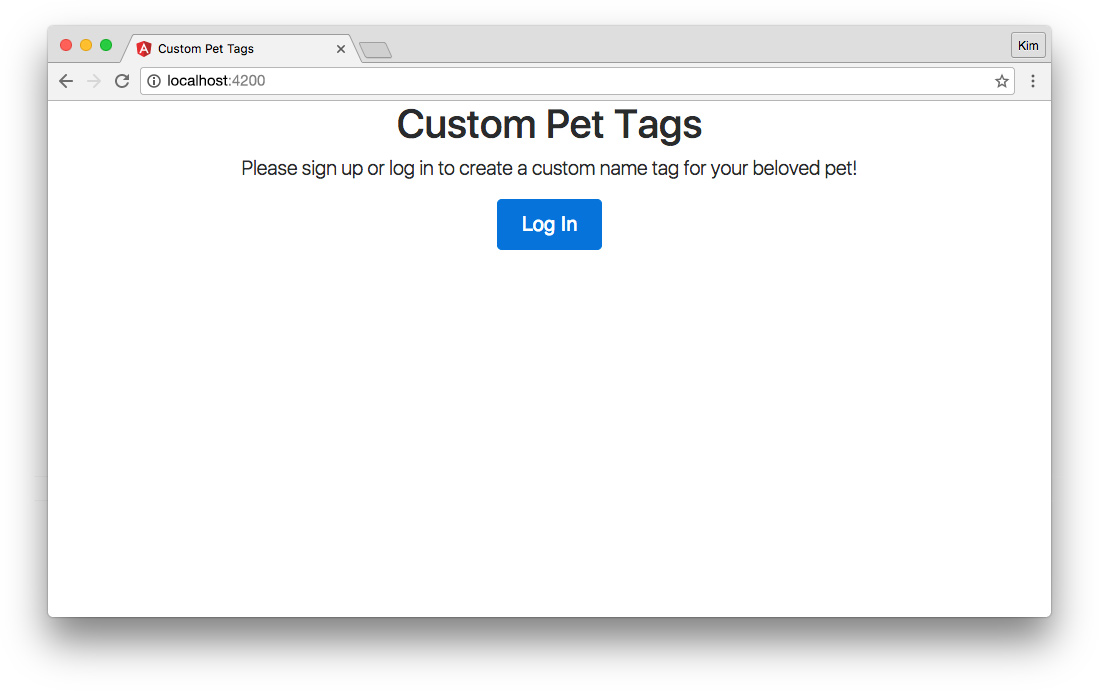
宠物标签模型
开始实现个性宠物标签生成器功能和状态管理的工作了。首先,为我们的状态创建一个数据模型,该模型描述了当前的宠物标签。
新建文件src/app/core/pet-tag.model.ts:
// src/app/core/pet-tag.model.ts
export class PetTag {
  constructor(
    public shape: string,
    public font: string,
    public text: string,
    public clip: boolean,
    public gems: boolean,
    public complete: boolean
  ) { }
}

export const initialTag: PetTag = {
  shape: '',
  font: 'sans-serif',
  text: '',
  clip: false,
  gems: false,
  complete: false
};
PetTag类声明了宠物标签的属性和类型,接着我们定义一个常量initialTag作为默认初始值,在初始化和重置状态时需要用到。
宠物标签行为
现在可以创建行为类型了。回顾之前说的,action被派发到reducer中,从而更新store。现在为我们想要的每种行为定义名字。
创建文件src/app/core/pet-tag.actions.ts
// src/app/core/pet-tag.actions.ts
export const SELECT_SHAPE = 'SELECT_SHAPE';
export const SELECT_FONT = 'SELECT_FONT';
export const ADD_TEXT = 'ADD_TEXT';
export const TOGGLE_CLIP = 'TOGGLE_CLIP';
export const TOGGLE_GEMS = 'TOGGLE_GEMS';
export const COMPLETE = 'COMPLETE';
export const RESET = 'RESET';
将行为定义为常量。我们也可以构造可注入的行为类,就像ngrx/example-app中那样。但我们这个例子很简单,用这种方法反而会增加复杂度。
宠物标签归约器
现在可以创建我们的归约函数了,这个函数接受action,更新store。
新建文件src/app/core/pet-tag.reducer.ts:
// src/app/core/pet-tag.reducer.ts
import { Action } from '@ngrx/store';
import { PetTag, initialTag } from './../core/pet-tag.model';
import { SELECT_SHAPE, SELECT_FONT, ADD_TEXT, TOGGLE_CLIP, TOGGLE_GEMS, COMPLETE, RESET } from './pet-tag.actions';

export function petTagReducer(state: PetTag = initialTag, action: Action) {
  switch (action.type) {
    case SELECT_SHAPE:
      return Object.assign({}, state, {
        shape: action.payload
      });
    case SELECT_FONT:
      return Object.assign({}, state, {
        font: action.payload
      });
    case ADD_TEXT:
      return Object.assign({}, state, {
        text: action.payload
      });
    case TOGGLE_CLIP:
      return Object.assign({}, state, {
        clip: !state.clip
      });
    case TOGGLE_GEMS:
      return Object.assign({}, state, {
        gems: !state.gems
      });
    case COMPLETE:
      return Object.assign({}, state, {
        complete: action.payload
      });
    case RESET:
      return Object.assign({}, state, initialTag);
    default:
      return state;
  }
}
首先从ngrx/store导入Action。同时也需要PetTag数据模型以及它的初始状态initialTag。还有上一步中创建的行为类型也需要导入。
然后创建petTagReducer()函数,该函数接收两个参数:上一个状态state和被派发的行为action。注意它是输入决定输出的纯函数,函数不会改变全局的状态。这就是说,从归约器返回的数据要么是新对象,要么是未修改的输入,比如default情况。
通常,我们可以借用Object.assign()从输入数据中得到全新的对象。输入数据是上一个状态以及包含行为载体(payload)的对象。
TOGGLE_CLIP和TOGGLE_GEMS切换initialTag状态中的布尔值,所以当我们派发这两种行为的时候,不需要行为载体,我们只需要简单取反即可。
COMPLETE行为需要一个载体,因为我们明确要将其设置为true,而且每个标签只能操作一次。我们也可以切换布尔值,但明确起见,我们还是会派发一个具体的值作为行为载体。
注意:注意
RESET行为用到导入的initialTag。因为它是个不变量,所以在这里使用并不会违背归约函数的纯性。
根模块导入Store
完成了行为和归约函数的定义之后,我们要告诉应用程序有这些的存在。打开app.module.ts文件,更新如下:
// src/app/app.module.ts
...
import { StoreModule } from '@ngrx/store';
import { petTagReducer } from './core/pet-tag.reducer';

@NgModule({
  ...,
  imports: [
    ...,
    StoreModule.provideStore({ petTag: petTagReducer })
  ],
  ...
现在,我们可以用Store来实现状态管理了。
创建“Create”页面
之前创建的CreateComponent是个智能组件(Smart Component),它会有几个木偶子组件(Dumb Component)。
智能组件/木偶组件
智能组件也称容器组件,通常作为根级组件,包含业务逻辑,状态管理,订阅,处理事件。在这个例子中,就是那些可路由的页面组件。CreateComponent是智能组件,它将为标签生成器制定业务逻辑。同时,它会处理木偶子组件触发的事件,而这些子组件是标签生成器的一部分。
木偶组件又名展示组件,它只决定于父组件传递的数据。它可以触发事件,然后在父组件中处理,但它不会直接影响订阅或者store。木偶组件是可复用的模块化组件。比如,我们会同时在Create页面和Complete页面使用标签预览这个木偶组件(CreateComponent和CompleteComponent是智能组件)。
“Create”页面功能点
Create页面将会有以下几个功能:
- 标签形状选择
- 标签字体选择和文案输入
- 是否添加clip和gems
- 标签形状和文案的预览
- 结束操作的完成按钮
“Create”组件脚本
我们先从CreateComponent开始,打开文件create.component.ts:
|
|
这个智能组件主要作用为自定义宠物标签。
引入OnInit以及OnDestroy,分别用于初始化和销毁订阅。同时,需要从RxJS中引入Observable和Subscription,从ngrx/store引入Store对象。由于行为基本都在这个组件中派发,所以需要引入之前定义好的所有行为(除RESET外)。最后,引入PetTag数据模型。
该组件不需要额外的样式,所以删除CSS文件以及对它的引用。
该类中,tagState$定义为PetTag数据类型的可观察对象,通过构造器中用store的select()方法赋值实现。
在ngOnInit()钩子函数中,将subscription(订阅)设置为对tagState$可观察对象的订阅。每当有新状态生成时,订阅就会把petTag设置为可观察对象流返回的新状态state。done属性用来检查shape和text是否已经填写。这两个属性是标签完成的必填项。当组件销毁的时候,ngOnDestroy()钩子函数被触发,执行销毁订阅。
最后,创建派发行为至store的事件处理函数。当子木偶组件触发事件来更新状态时,这些事件处理函数就会执行。每个函数都用store.dispatch()派发期望的行为类型type和行为载体payload至归约函数。
注意: 在更复杂的应用中,你可能希望在单独的服务中派发行为,然后注入到组件中。不过,现在我们这个仅仅为学习而创建的小应用,没有必要这么做。直接在智能组价中派发行为就行了。
形状组件
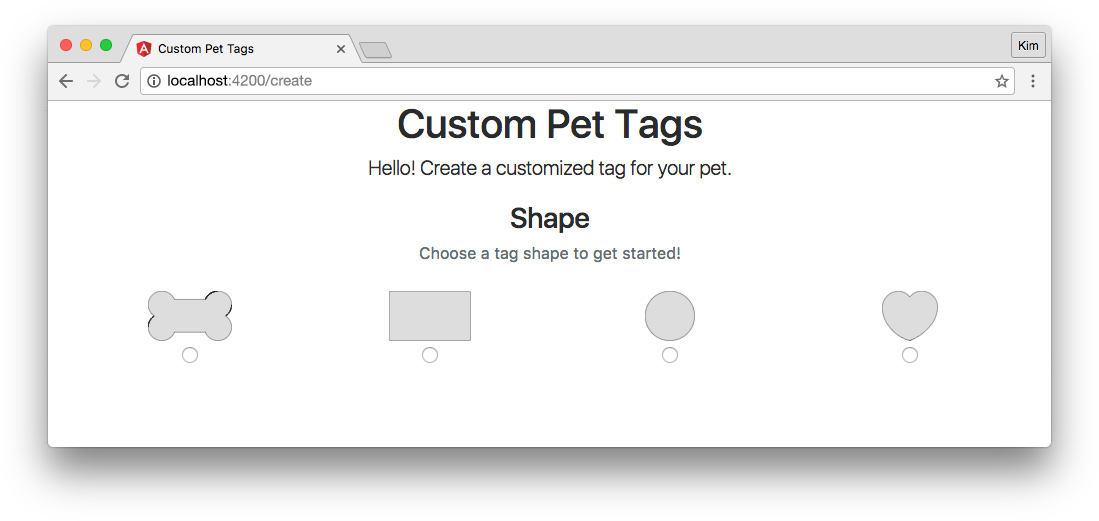
开始创建我们的第一个展示组件:TagShapeComponent。当该组件完成时,创建页面预期效果如下:
用Angular CLI命令一键生成这个子组件的脚手架:
$ ng g component pages/create/tag-shape
标签形状组件将会展示四种不同的形状图片:骨头形,方形,圆形,心形。用户可以从中选择喜欢的形状。
从git仓库下载图片,放置在pet-tags-ngrx/src/assets/images目录下。
形状组件脚本
打开tag-shape.component.ts文件:
// src/app/pages/create/tag-shape/tag-shape.component.ts
import { Component, Output, EventEmitter } from '@angular/core';

@Component({
  selector: 'app-tag-shape',
  templateUrl: './tag-shape.component.html',
  styleUrls: ['./tag-shape.component.css']
})
export class TagShapeComponent {
  tagShape: string;
  @Output() selectShapeEvent = new EventEmitter();

  constructor() { }

  selectShape(shape: string) {
    this.selectShapeEvent.emit(shape);
  }

}
从@angular/core引入Output和EventEmitter。
形状选择用radio按钮表示,所以需要一个属性来储存形状。由于形状是用字符串来描述的,我们将tagShape的类型设置为string。
当用户选择某个形状之后,我们需要装饰器@Output来触发事件。并且发送信息至父组件CreateComponent。selectShape(shape)函数会触发携带形状信息的事件,然后父组件用先前在CreateComponent定义的selectShapeHandler()去处理。稍后我们就可以看到父子组件共同工作的效果。
形状组件模版
在那之前,先让我们来修改一下TagShapeComponent的模版内容。打开文件tag-shape.component.html,修改如下。
|
|
创建四个radio按钮分别对应四个形状的图片。无论选择哪个,都会触发(change)事件,然后触发携带tagShape参数的selectShapeEvent事件。
形状组件样式
打开tag-shape.component.css文件, 添加样式如下:
/* src/app/pages/create/tag-shape/tag-shape.component.css */
:host {
  display: block;
  margin: 20px 0;
}
.tagShape {
  padding: 10px;
  text-align: center;
}
img {
  display: block;
  height: auto;
  margin: 0 auto;
  max-height: 50px;
  max-width: 100%;
  width: auto;
}
注意:
:host伪类选择器是用来获取组件的宿主元素,也就是<app-tag-shape>。
添加形状组件至Create页面
最后,将TagShapeComponent添加至智能组件CreateComponent模版中,我们就算完成了。打开create.component.html文件,替换如下:
<!-- src/app/pages/create/create.component.html -->
<p class="col-sm-12 text-center lead">
  Hello! Create a customized tag for your pet.
</p>

<app-tag-shape
  (selectShapeEvent)="selectShapeHandler($event)"></app-tag-shape>
父组件现在能监听到来自子组件的selectShapeEvent事件,同时通过执行之前在CreateComponent中定义的selectShapeHandler()函数来处理该事件。回忆一下,这个函数派发了SELECT_SHAPE行为至store:
selectShapeHandler(shape: string) {
  this.store.dispatch({
    type: SELECT_SHAPE,
    payload: shape
  });
}
现在,应用可以在用户选择形状的时候更新状态了。
文字组件
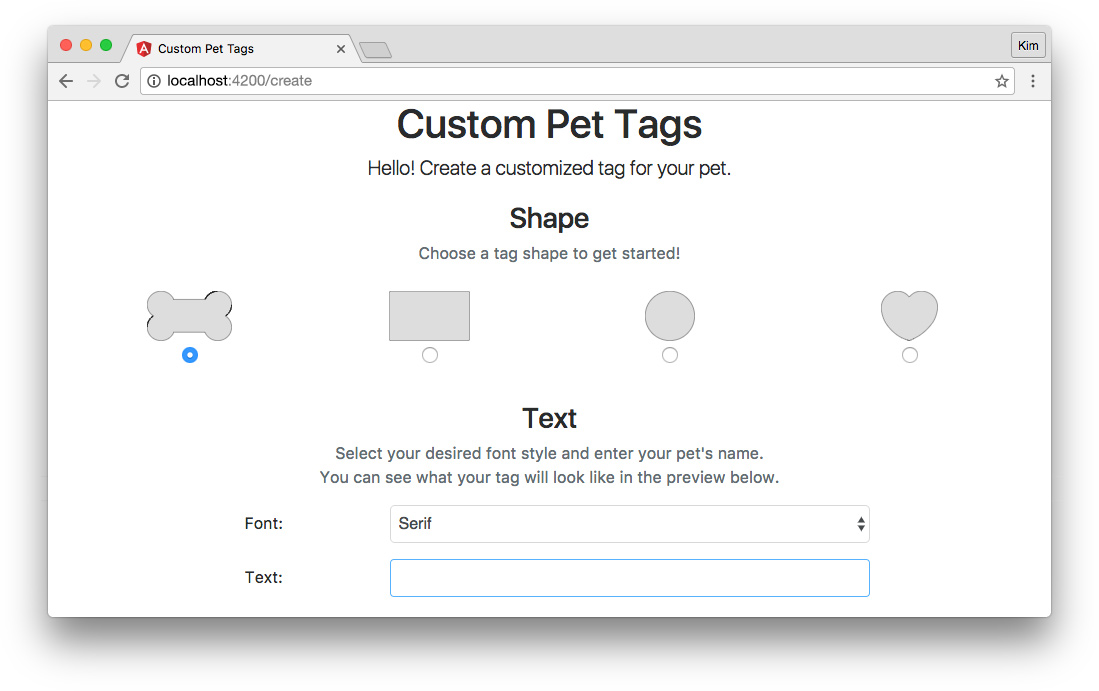
现在我们来创建用户输入字体和文字的组件。完成后,页面期待效果如下:
用命令行来创建该组件的手脚架:
$ ng g component pages/create/tag-text
文字组件脚本
打开tag-text.component.ts文件,修改如下:
// src/app/pages/create/tag-text/tag-text.component.ts
import { Component, Output, EventEmitter } from '@angular/core';

@Component({
  selector: 'app-tag-text',
  templateUrl: './tag-text.component.html',
  styleUrls: ['./tag-text.component.css']
})
export class TagTextComponent {
  tagTextInput = '';
  fontType = 'sans-serif';
  @Output() selectFontEvent = new EventEmitter;
  @Output() addTextEvent = new EventEmitter;

  constructor() { }

  selectFont(fontType: string) {
    this.selectFontEvent.emit(fontType);
  }

  addText(text: string) {
    this.addTextEvent.emit(text);
  }

}
该组件跟上一个组件TagShapeComponent工作方式相同,所以代码也差不多。引入Output和EventEmitter,并且创建tagTextInput和fontType属性来记录用户的输入。
注意:这里我们不需要声明
string类型,因为初始值默认定义了变量的类型。
当用户修改字体或者文字时,组件就会触发事件让父组件捕获。
文字组件模板
标签文字组件模板tag-text.component.html代码如下:
|
|
我们用<select>元素和文本输入框让用户操作选择自己喜欢的效果。用户输入时,ngModel保证了数据的双向一致性,(change)使得该组件触发事件到父组件。
文字组件样式
我们只需在tag-text.component.css中添加一个样式:
/* src/app/pages/create/tag-text/tag-text.component.css */
:host {
  display: block;
  margin: 20px 0;
}
添加文字组件至Create页面
最后将TagTextComponent组件添加到Create页面:
<!-- src/app/pages/create/create.component.html -->
...
<app-tag-text
  *ngIf="petTag.shape"
  (selectFontEvent)="selectFontHandler($event)"
  (addTextEvent)="addTextHandler($event)"></app-tag-text>
注意我们在<app-tag-text>元素上加了*ngIf结构指令,我们希望用户在选择了标签形状之后才显示该组件。我们即将创建标签预览组件,没有标签形状的预览没有什么意义,*ngIf保证了这点。
在父组件中监听TagTextComponent的selectFontEvent和addTextEvent事件,然后用之前在CreateComponent定义好的方法去处理。处理方式分别为派发SELECT_FONT和ADD_TEXT以及对应的行为载体(payload)至归约器(reducer):
selectFontHandler(fontType: string) {
  this.store.dispatch({
    type: SELECT_FONT,
    payload: fontType
  });
}

addTextHandler(text: string) {
  this.store.dispatch({
    type: ADD_TEXT,
    payload: text
  });
}
附加特性组件
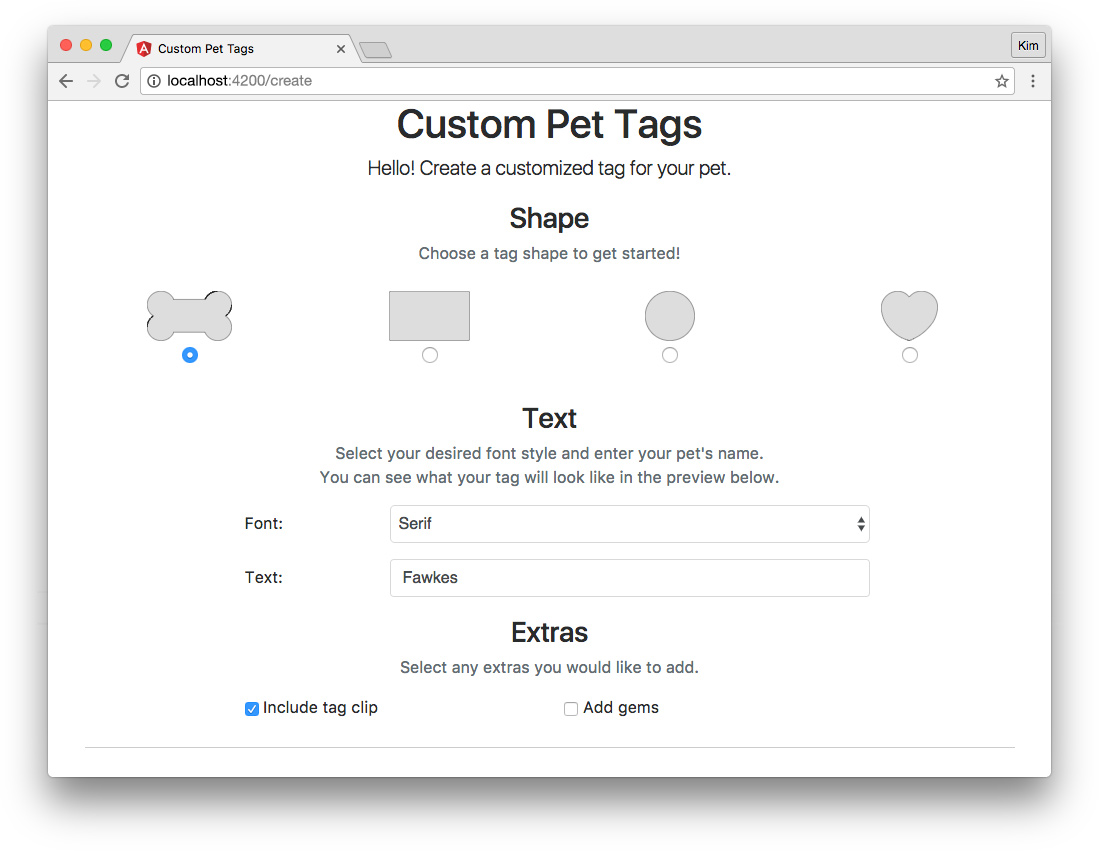
现在,我们来添加能让用户额外选择的几个特性。完成之后,创建页面预期效果如下:
同样用命令来创建TagExtrasComponent组件的手脚架:
$ ng g component pages/create/tag-extras
附加特性组件脚本
打开tag-extras.component.ts,修改如下:
// src/app/pages/create/tag-extras/tag-extras.component.ts
import { Component, Output, EventEmitter } from '@angular/core';

@Component({
  selector: 'app-tag-extras',
  templateUrl: './tag-extras.component.html',
  styleUrls: ['./tag-extras.component.css']
})
export class TagExtrasComponent {
  tagClip: boolean;
  gems: boolean;
  @Output() toggleClipEvent = new EventEmitter;
  @Output() toggleGemsEvent = new EventEmitter;

  constructor() { }

  toggleClip() {
    this.toggleClipEvent.emit();
  }

  toggleGems() {
    this.toggleGemsEvent.emit();
  }
}
代码看起来应该很熟悉了吧?! 额外选项包括是否添加clip和gems,所以这两个参数是boolean类型。
附加特性组件模板
打开tag-extras.component.html,添加代码如下:
<!-- src/app/pages/create/tag-extras/tag-extras.component.html -->
<div class="row">
  <div class="col-sm-12 text-center">
    <h3>Extras</h3>
    <p class="form-text text-muted">Select any extras you would like to add.</p>
  </div>
</div>

<div class="row">
  <div class="col-sm-4 offset-sm-2">
    <label>
      <input
        type="checkbox"
        [(ngModel)]="tagClip"
        (change)="toggleClip()"> Include tag clip
    </label>
  </div>

  <div class="col-sm-4">
    <label>
      <input
        type="checkbox"
        [(ngModel)]="gems"
        (change)="toggleGems()"> Add gems
    </label>
  </div>
</div>
用checkbox让用户来勾选是否要添加额外特性。
附加特性组件样式
由于该组件是最后一个标签编辑组件,我们希望在底部添加边界线,打开tag-extras.component.css文件,添加如下:
/* src/app/pages/create/tag-extras/tag-extras.component.css */
:host {
  border-bottom: 1px solid #ccc;
  display: block;
  margin: 20px 0;
  padding-bottom: 20px;
}
添加附加特性组件至Create页面
在create.component.html文件中添加如下代码:
<!-- src/app/pages/create/create.component.html -->
...
<app-tag-extras
  *ngIf="petTag.shape"
  (toggleClipEvent)="toggleClipHandler()"
  (toggleGemsEvent)="toggleGemsHandler()"></app-tag-extras>
跟标签文字组件一样,我们只在用户选择了标签形状之后才显示附加特性选项。toggleClipEvent和toggleGemsEvent事件被之前在CreateComponent定义好的方法处理,处理方式分别为派发TOGGLE_CLIP和TOGGLE_GEMS行为至归约器:
toggleClipHandler() {
  this.store.dispatch({
    type: TOGGLE_CLIP
  });
}

toggleGemsHandler() {
  this.store.dispatch({
    type: TOGGLE_GEMS
  });
}
由于选择的切换是布尔值,不需要行为载体。这种情况,我们只需要在归约器中使用上一个状态来决定下一个状态。
预览组件
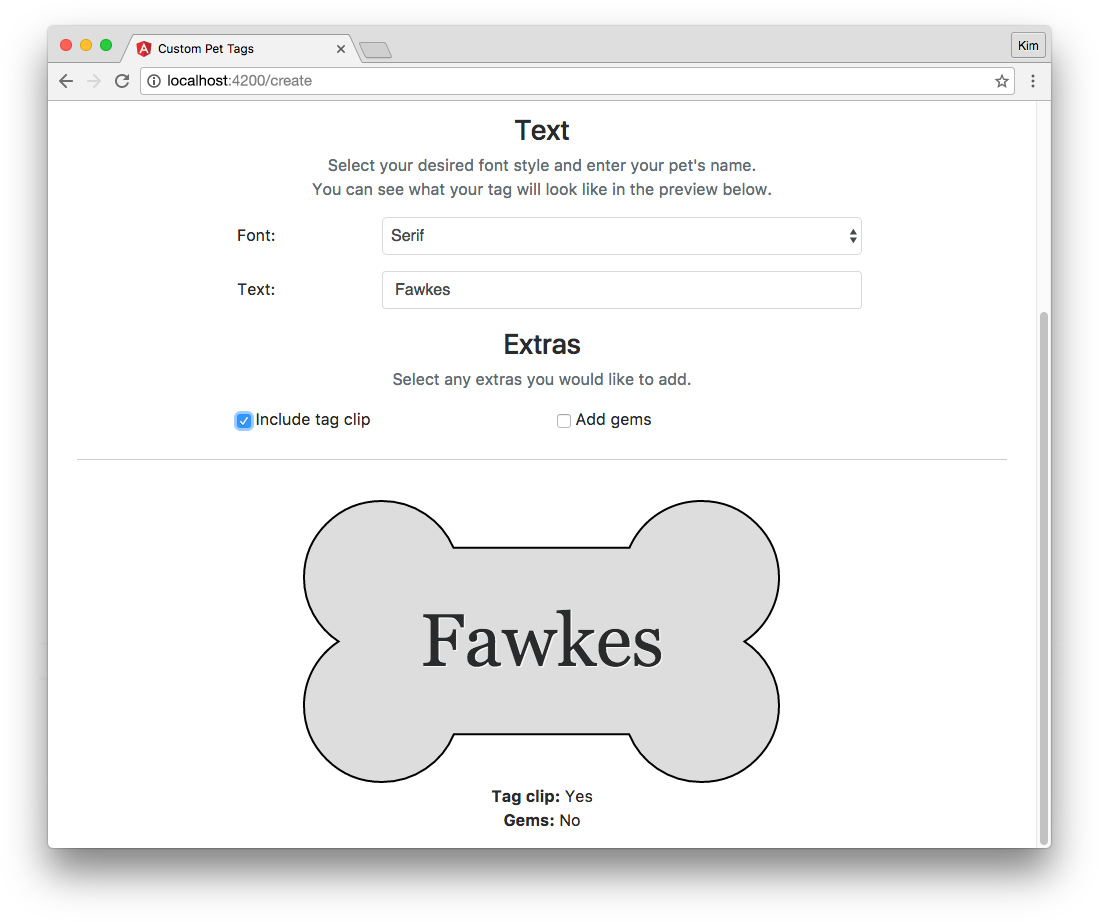
现在让我们来创建标签预览组件,预期效果如下:
用命令行来创建TagPreviewComponent组件的手脚架,它将是Create页面和Complete页面的子组件,所以把这个组件放在app文件夹下:
$ ng g component tag-preview
预览组件脚本
打开tag-preview.component.ts文件,修改如下:
TagPreviewComponent是接受父组件CreateComponent输入的木偶子组件,它并不向父组件传递数据。引入Input装饰器以及OnChanges生命周期函数钩子,同时需要引入PetTag表明输入的类型。
TagPreviewComponent类需要实现OnChanges接口,也就是在该类中调用ngOnChanges方法。每当组件的输入参数发生变化时,ngOnChanges就会执行。这样才能实现在用户编辑修改的时候实时预览效果。
从父组件中接受的数据@Input() petTag是个状态对象,数据类型是之前定义的PetTag。比如,一个petTag对象可能是这样的:
{
  shape: 'bone',
  font: 'serif',
  text: 'Fawkes',
  clip: true,
  gems: false,
  complete: false
}
我们希望友好直观地展示数据,所以我们将会显示标签的形状图片,文案,以及是否包含了clip和gems。
当用户进行操作时,需要专门设置一下图片的路径以及clip和gems的文案(Yes或者No)。输入是由CreateComponent对tagState$这个可观察对象的订阅提供。
预览组件模版
打开tag-preview.component.html文件,添加代码如下:
<!-- src/app/tag-preview/tag-preview.component.html -->
<div *ngIf="petTag.shape" class="row tagView-wrapper">

  <div class="col-sm-12">
    <div class="tagView {{petTag.shape}}">
      <img [src]="imgSrc" />
      <div class="text {{petTag.font}}">
        {{petTag.text}}
      </div>
    </div>

    <p class="text-center">
      <strong>Tag clip:</strong> {{tagClipText}}<br>
      <strong>Gems:</strong> {{gemsText}}
    </p>
  </div>

</div>
预览将会在用户选择标签形状之后显示。用一个shape样式类来控制显示正确的形状图片,同时也会显示标签的文字,字体是用font样式类来控制的。最后,直接标注出用户是否选择了包含clip,gems两个特性。
预览组件样式
之前我们定义4个标签形状:骨头形,方形,圆形,心形。为了优雅地展示预览效果,我们需要额外的样式。打开tag-preview.component.css样式,添加如下:
除了一些定位之外,我们根据不同形状设置了不同的字体大小,根据用户选择设置不同字体。
现在,我们可以添加<app-tag-preview>到Create页面了。
将预览组件添加至Create页面
打开create.component.htm,将该组件添加至最底部:
<!-- src/app/pages/create/create.component.html -->
...
<app-tag-preview
  [petTag]="petTag"></app-tag-preview>
方括号[...]单向绑定属性,我们在CreateComponen组件的订阅tagStateSubscription中已经创建了petTag,现在将其传递给预览组件。
现在,我们应该可以看到标签的实时预览效果了:
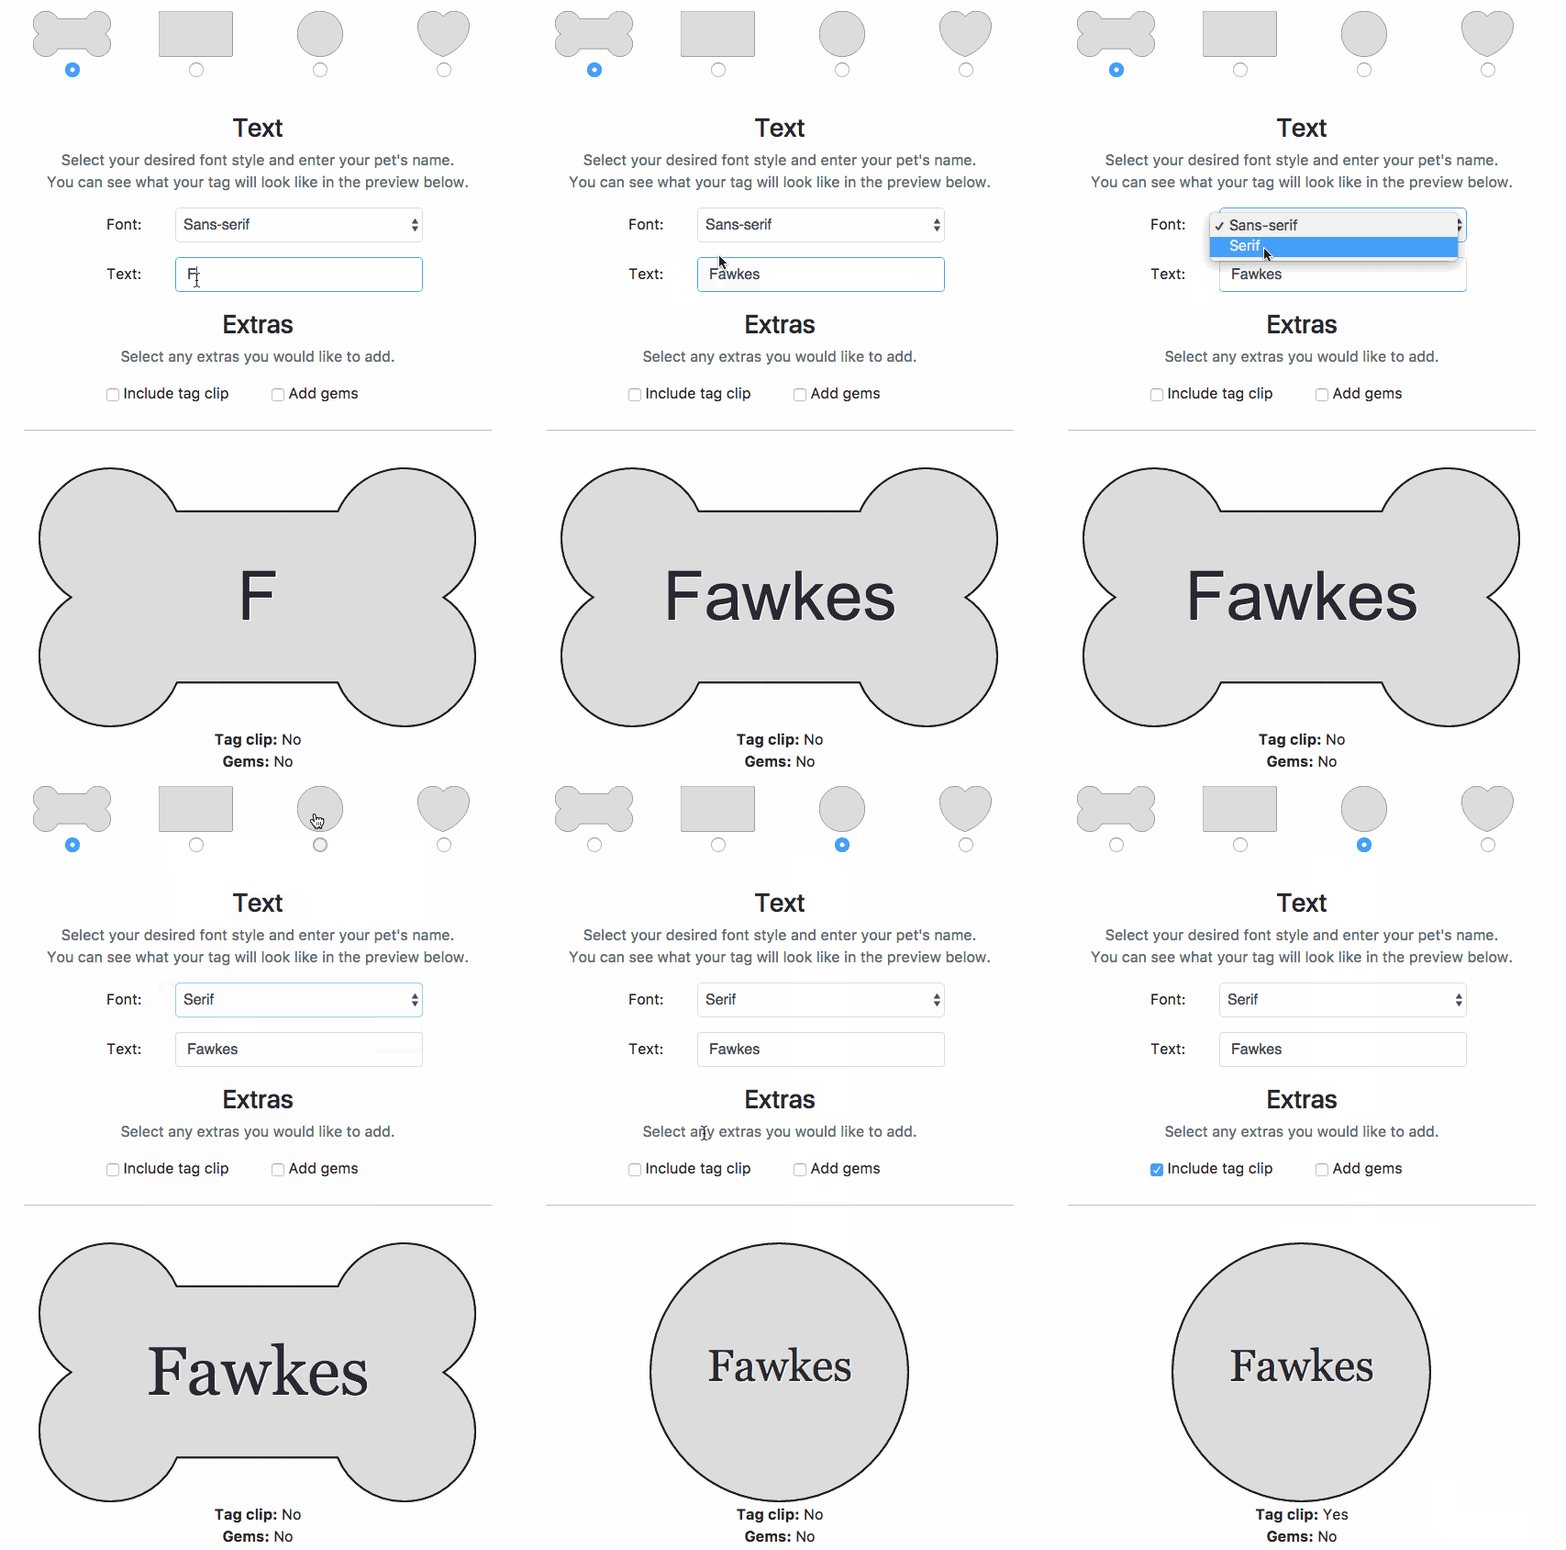
提交完成标签
有了标签生成器和标签预览之后,添加一个Done按钮来提交创建好的标签到Complete页面。完成之后,页面如下:
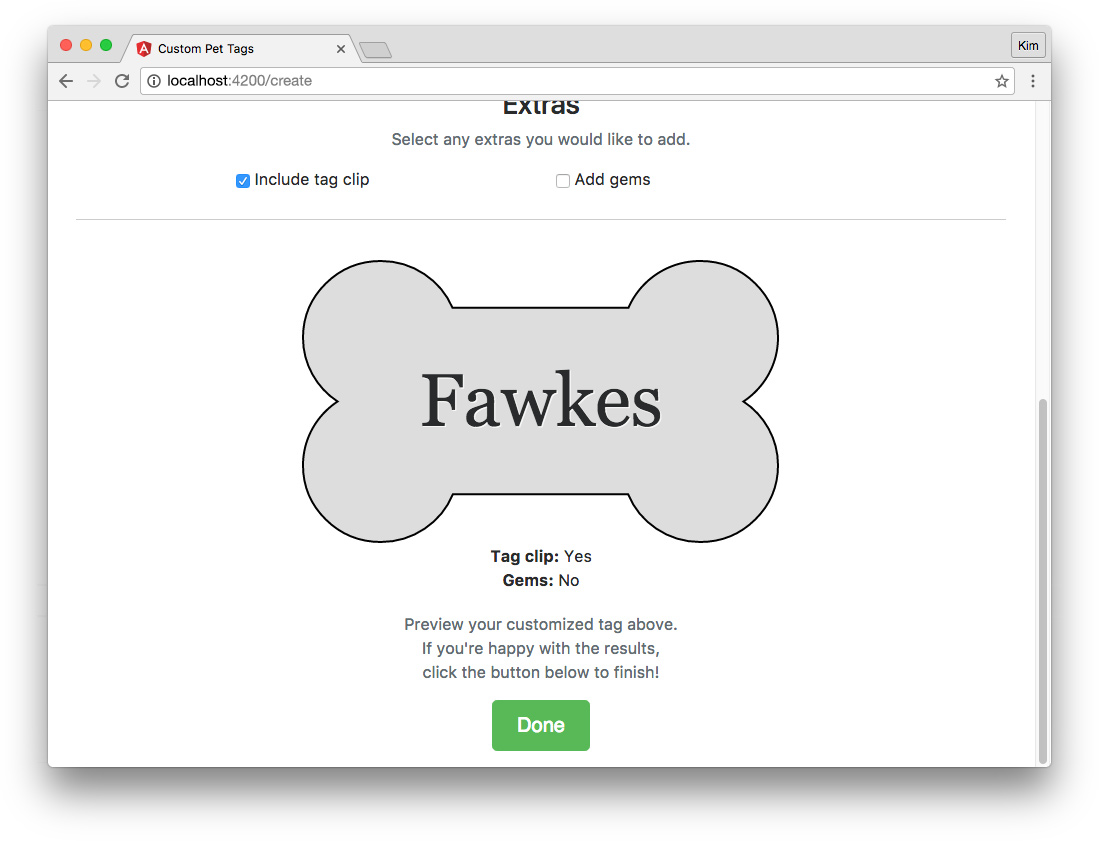
我们已经在CreateComponent中创建了submit()方法,该方法派发带有载体的COMPLETE行为至归约器。我们只需要在create.component.html页面创建一个调用该方法的按钮即可:
<!-- src/app/pages/create/create.component.html -->
...
<div class="row">
  <div class="col-sm-12 text-center">
    <p class="form-text text-muted" *ngIf="petTag.shape">
      Preview your customized tag above.<br>
      If you're happy with the results,<br>
      click the button below to finish!
    </p>
    <p>
      <button
        class="btn btn-success btn-lg"
        *ngIf="petTag.shape"
        [disabled]="!done"
        (click)="submit()"
        routerLink="/complete">Done</button>
    </p>
  </div>
</div>
我们之前在CreateComponent的tagStateSubscription对象中定义了done属性。 当done属性是false的时候,我们禁用提交按钮。
this.done = !!(this.petTag.shape && this.petTag.text);
当标签有形状和文字时,我们就认为该标签已经可以提交了。如果用户已经添加了这些,他们就可以点击提交按钮完成标签的创建。同时,我们将用户导航至Complete页面。
“Complete”页面组件
在设置路由的时候,我们就搭建好了Complete页面的手脚架。当这个页面创建好之后,页面效果如下(前提是用户创建了一个标签):
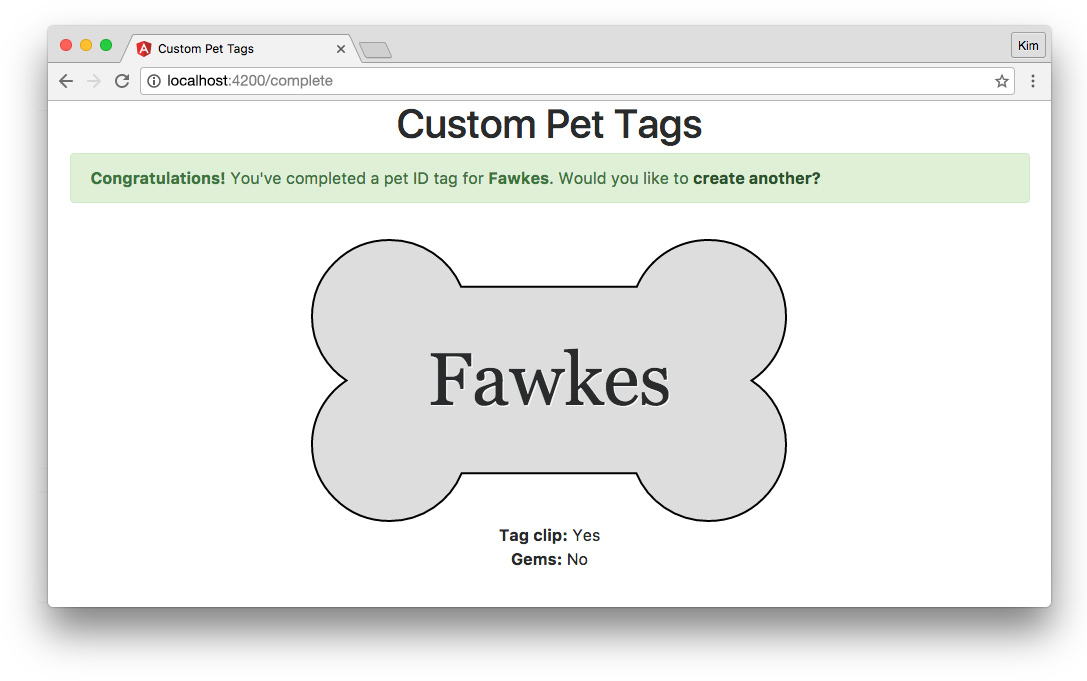
“Complete”页面组件脚本
打开智能组件complete.component.ts,添加代码如下:
CompleteComponent组件是可路由的容器组件。需要导入OnInit, OnDestroy, Observable, Subscription以及Store管理store订阅。同时,有个重置按钮,用户点击之后可以重新创建标签。store中的状态也会跟着重置,所以需要导入RESET行为, PetTag数据类型以及默认初始值initialTag。
这个组件不需要Bootstrap以外的样式,所以我们可以把样式文件complete.component.css以及相应的引用删掉。
类似CreateComponent组件,我们需要创建tagState$的可观察对象tagStateSubscription,以及局部变量petTag。同时,我们需要创建PetTag数据类型的emptyTag变量,然后将其赋值为initialTag。
在构造函数中,将tagState$设为store可观察对象。然后在ngOnInit()函数中,订阅这个可观察对象,并且设置petTag属性。在ngOnDestroy()函数中,通过退订来销毁订阅。最后,newTag()函数派发RESET行为,使得应用的状态重置,用户可以继续定制他们的下一个标签了。
“Complete”页面组件模板
CompleteComponent组件的模板代码如下:
<!-- src/app/pages/complete/complete.component.html -->
<div *ngIf="petTag.complete">
  <div class="row">
    <p class="col-sm-12 alert alert-success">
      <strong>Congratulations!</strong> You've completed a pet ID tag for <strong>{{petTag.text}}</strong>. Would you like to <a (click)="newTag()" routerLink="/create" class="alert-link">create another?</a>
    </p>
  </div>
  <app-tag-preview [petTag]="petTag"></app-tag-preview>
</div>

<div *ngIf="!petTag.complete" class="row">
  <p class="col-sm-12 alert alert-danger">
    <strong>Oops!</strong> You haven't customized a tag yet. <a routerLink="/create" class="alert-link">Click here to create one now.</a>
  </p>
</div>
首先展示恭喜用户成功为他们的宠物创建个性标签的提示,名字也会从petTag状态对象中取过来。同时,提供一个能重新创建新标签的链接,点击之后执行newTag()方法,该方法会将路由导航到创建页面重新开始。
接着,展示带有petTag的标签预览组件: <app-tag-preview [petTag]="petTag">。
最后,如果用户在没有完成标签的定制下手动导航到/complete页面的话,我们就会显示一个错误信息。同样有个链接,可以让用户回到创建页面。错误页面效果如下:
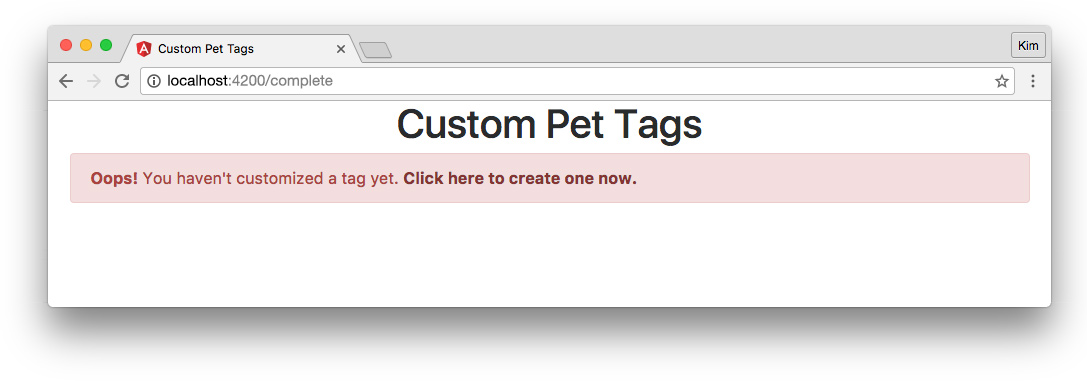
至此,我们简单的Angular + ngrx/store应用完成了。
题外话:你可能不需要ngrx/store
状态管理库很棒,但请你确保在正式投入实际项目前你已经读过了这篇文章You Might Not Need Redux。
这个例子很简单,因为我们是用ngrx/store来教学。当你想用来投入实际项目时,你需要权衡一下必要性以及它的利弊。Angular(吸纳了RxJS)已经可以很方便地用service管理全局状态。因此,小型简单应用用局部变量就能很好地维护了。这种场景下,如果引入非必要的ngrx/store,可能会带来困扰和麻烦。
而在管理大型复杂项目的状态时,ngrx/store及其同类库是非常出色的工具。希望你现在已经有能力判断Redux和ngrx/store使用的原理。这样你就能知道如何以及何时应该使用状态管理库了。
附状态管理相关资源
附上一些学习状态管理的好资源:
- ngrx/store on GitHub
- @ngrx/store in 10 minutes
- Comprehensive Introduction to @ngrx/store
- ng-conf: Reactive Angular 2 with ngrx - Rob Womald
- Angular 2 Service Layers: Redux, RxJS and Ngrx Store - When to Use a Store and Why?
- Getting Started with Redux - Dan Abramov on Egghead.io
Angular的服务和组件通信在小型应用中的数据传递变得相当简单,但在复杂应用中仍是个棘手的问题。类似ngrx/store的全局store在组织状态管理中起到了很大的辅助作用。希望你现在已经准备好用ngrx/store构建自己的Angular应用了!